
- All
- Product Name
- Product Keyword
- Product Model
- Product Summary
- Product Description
- Multi Field Search

Views: 295 Author: Site Editor Publish Time: 2022-01-16 Origin: Site


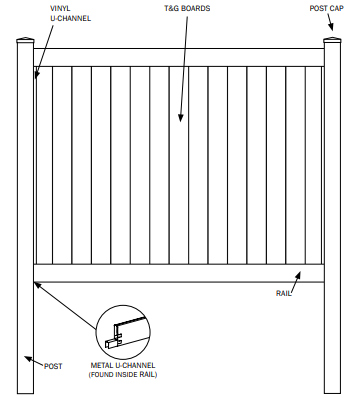
Have you encountered any problems when installing the fence board? Next we will show you some tips for installing the fencing board.
PLANNING
• Prior to construction, check with your local regulatory agency for special code requirements in your areas.
• Contact your utility supplier to locate and mark underground lines.
• Sketch out the layout of your fence and calculate the number of panels, gates, posts and caps needed for your project.
• Adjust layout to accommodate as many full panels as possible. If you must use a partial panel, place in the furthest.
• Careful planning and measuring of your fence
DIGGING POST HOLES
• String your line from end to end turning at corners. This will enable a straight line of fence.
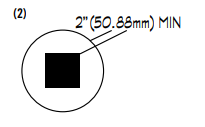
• It is recommended to dig one hole at a time. Dig post holes 10” to 12”in diameter and 36” to 42” deep (depending on local ordinance or expected frost depth in winter). The hole should be as deep as the post depending on grade. No less than 30” below grade for 5” x 5” posts and 32” for 8” x 8” posts. The diameter of the hole should be no less than 12” for 5” x 5” posts and 15” for 8” x 8” posts. A premium wet or dry concrete mix is to be used depending on ground condition in the area.
•Space post holes on center measurements based on the style you’ll be installing (See appropriate style spec sheet). Use a string line to ensure all post holes are in line and verify spacing between holes.

SETTING & INSTALLING POSTS AND PANELS
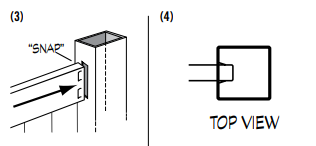
•Snap in the pre-notched, pre-assembled section panel into the post before concrete sets .(Figures 3 & 4)
• Repeat process with each section
• Level sections to desired grade
• Lastly, use a small amount of glue on
Other considerations
• Not too Tight
Make sure you don't install your panels to tight together. Vinyl needs room to move. Vinyl will expand and change due to different types of weather. Installing the panels too tightly together, causes the vinyl to be restricted, which will result in your fence giving that ribbon affect. You will begin to see dips and bend in the panels.
• One at a Time
Some home owners have tried to install their panels in a more quick manner. However, installing your panels more than one at a time, gives the panels a chance to become uneven, which in turn makes your hard work kind of a waste. As you install your panels one at a time, you will also want to stop your work frequently, using your level each time, to make sure each panel is installed straight. The panels are very easily movable when you are working on installing them all. Making sure they are level throughout your process will make things a whole lot easier and faster for you.
•Use a Level
The best thing you can do is to use a level to make sure that your panels are straight. Use it for the top line of the fences.
You will also want to make sure that they stay level after you have poured the concrete, as well as when the concrete is setting up.
For more information, please feel free to contact us.


